I know I mentioned that I recently got a felting machine. I got it just a couple days before Mother's Day. I embellished 3 pairs of shorts with my new machine. Shorts are made from my old jeans. I know you must get tired of hearing made from old jeans over and over. The good news for you (bad for me) is I am running out of jeans. I will have to start using my fabrics soon (I might even use some of the beautiful Japanese fabrics I got for Christmas). Are you wondering how I have been sewing with an old stash of jeans for 3+ years now without running out? My large collection of jeans came from my hubby moving up in size 2 or3 times, add to that my HUGE collection of thin clothes (before I became a mom), and jeans given to me to make things with (thanks to my Mom, Dad, and MIL). My own large collection of old (thin) jeans have been tucked in a cubby in the back of my closet out of the way for years. I now need that space to store my new sewing machines (my family is getting tired of having 4 machines on the kitchen table all at the same time). I figured the best thing to do is to embroider one day, sew one day, serge the edges another, and embellish (use the felting machine) another day. That system I hope will keep the fabric and supplies tucked away and I will only need to move one machine at meal times. In the next week I hope to move whatever machine I am using out on my porch to use when my children are playing in the yard. When that happens my kitchen table should be free of my messes.
The first shorts I decorated with craft felt that I cut into a flower and a butterfly.
Close up of flower all the edges of the flower curl up a bit and look cute.The butterfly I did add a bit of hand dyed superwash merino to outline the wings.
I made them for Demi but Zee claimed them. She hugs them and yells for them when she sees them. The day Demi tried them on Zee screamed and yelled for them and even tried pulling them off of Demi. LOL! I decided it was best to give them to Zee because she likes them so much and Demi didn't care that much for them. They are longer shorts on Zee but she is happy with them so we are all happy.
My favorite shorts are this pair.
Front side.
Back side.
I used some yellow and white cotton dishcloth yarn to decorate them. I added quilt strips to the bottom. Notice this pair of shorts are not made from the bottom of jeans. I can get 2 pairs of jeans (size 18months-4 T) out of one pair of jeans. When my children are babies (newborn-12 months) I can get 3 pairs of shorts from one pair of jeans. I used my new gathering foot for my overlock machine (my family gave me for Mother's Day) to add the ruffles. I am not crazy about the gathering foot (seems to be more fiddly and takes longer than the clear elastic method that I normaly use). I hope in time it will grow on me. After looking at some clothes in the stores with the stitching showing I decided to leave the serging at the bottom show. I view them all as play clothes that will be worn playing in the sand box and at the park. they are made from old clothes. Because of that I didn't take the time to turn under the stitching to hem it under. They are my favorite out of the three. They fit Demi as long shorts and Zee as gauchos (wide leg crop pants). All I did was swirl some yarn and tack it down with the felter. Quick, easy, and fun!
The last pair of shorts are Demi's favorite. She insisted on wearing them the first 3 days after I made them. They never get put away it is right from the clean clothes basket to her body. I think she might even like them more than her dresses.
I made them from some merino roving I dyed.I love how needle felting dyed roving gives the look of water colored painting (I think that is what it is called).
Here is a close up of the big mushroom.and a closeup of the baby mushrooms.
Sorry I didn't take any pictures of the children wearing them. I am glad I remembered to snap a picture at all. I am sure I will have lots of pictures of my girls wearing them by the end of summer. I am sure everyone will be sick of seeing them.
If you don't have a felting machine but like any of the shorts and might want to make something similar let me say you can easily do this without buying a felting machine. Needle felting can be very cheap. Felting needles run $5-6 at Joanns for a pack of 4 needles. I started needle felting with a 4 piece assortment pack from Joanns. When I first started out I bought the assortment pack and the felting foam (that was about $3 or $4). The foam is not needed you can use any old thick pillow or foam. The reason for the felting foam is to give you something to stab the needles into. As long as the foam or pillow is thick or firm enough you will be fine (make sure the needles don't poke out the back side). I get a lot more than $5 of fun out of a pack of needles! I have seen some online kids craft projects that they say children can use felting needles. My son is 9 and I worry a bit that he might stab himself with the sharp needles so I let him use my felting machine (after I set the guard) and I plan to get him a clover felting tool. The stand alone needles I think are a bit more dangerous to use (for my 9 year old son who often gets distracted with what he is doing). I have poked myself with a felting needle many times and it does hurt. Of course I have poked myself with sewing needles a lot more than felting needles.
You can buy a clover felting tool that is a bit easier to use than the needles alone for a little bit more money. Joann's sells them for about $16.50 and you can buy needles to replace the ones in the tool when they bend or break.
This place has excellent prices on felting supplies http://www.tryourdesigns.com/index1.htm The person who owns it I think is the list mom for the machine felting group. Her prices for hand felting needles and machine felting needles are a lot cheaper than any other place I have seen. When I need new needles for my machine or to use by hand I will be trying this place out.
If you live near me (NE PA) and ever want to give felting a try stop by and we can make a day of it!
I am in a bit of a rush I hope this post makes sense. I don't have any time to look it over. It is Sunday and my family is waiting for me to join them. I will be back in a day or two (I hope).
Sunday, May 31, 2009
Felting simple sock mending
I just noticed that I haven't shared any of my felting projects lately. Felting and dying are probably my favorite two crafts to do. I have been using this blog lately as a way to jot down notes so if someone asks me how I did something I will be able to look back and see (this is the reason I have all the silly notes to self on many of my post). I don't know many people who felt and felting is such a simple process I don't ever feel like I need to take notes. I rarely ever want to felt the same object twice and I have given very few felted things as gifts. Most of my felting time is just fun playing around time.
I figured I should post a few of my felting projects (things I made April-May) so the people who hear me talk about how much I love to felt can see some of what I do with it.
Back in April my mom wore some holes in some socks I knit her. I knit her the socks well over a year ago. I knit them with some merino I spun and I dyed it in very long loops making it a self striping yarn. My Mom LOVES her socks. I DON'T love them because I was a very new knitter when I made them and the yarn I spun took forever to spin and dye. Last month after wearing a hole in her socks she showed them to me and asked if I could fix them for her. I tired to tell her it was time to get rid of them (toss them, give them to the birds to make nest with, cut up into compost to put in the garden, or such) but she wouldn't agree to that. She said she would keep them and wear them with holes if I wouldn't fix them.
Here is the hole.
The thin heel. I imagine the very thin spot on the heel is a thin spot in my spinning more than a worn spot from her wearing them.
A very thin area along the ankle. This is probably a thin spun yarn area and being soft merino wool (no nylon or mohair to strengthen it) I am sure it got thinner from shoes rubbing on it.
I didn't have any yarn dyed to match and I was very busy making Easter dresses for my girls and an Easter gift for my Mom so I took the easy way out and patched her socks with some needle felting.
I need to let all knitters, who are gasping at the thought of felting to mend socks, know that I am not a knitter! I only know how to make socks and I can't follow a real knitting pattern. I don't have the skill to "mend socks". If you are a knitter you probably already know that handspun single ply merino is not a strong yarn to make socks with. I now know to ply it with nylon or mohair but back then I didn't know anything about making socks.
To mend the socks I cut a patch of pink felt that I had laying in the craft box (the pink felt was scraps from a sweater that I machine felted and dyed pink months ago). I put the patch with a bit of roving over the worn bottoms and needle felted it together. I ended up padding the entire heel on both socks. I hope doing that will give the sad old socks a bit more time to wear them before they fall apart. I used some roving (white because I didn't have time to dye any) and felted in the worn out areas on the ankle. Last thing I did was I cut a tiny heart shape to cover the hole and felted that on.
Sure this might be the worst mending job ever done to a pair of socks but I feel the pink heart over the hole is a very cute fix! The heart is the kind of thing my Mom did when I wore out my rag dolls or favorite clothes. The pads on the heels don't show when she is wearing the sock and I hope the padding feels nice and soft on her feet. If I had a bit more time to fix them I think I would have still felted them and most likely used the pink patches but I would have dyed some roving to use so the white spots would blended in a bit better.
I don't know if I will ever learn how to properly mend socks. To me a patch on the knees was good enough for me as a child to fix my favorite jeans so a patch on the heals is also "good enough" in my eyes. I think patches are a fun way to embellish clothing (even socks). I am not the best knitter so none of my socks are "a thing of beauty". They will never compare to the beautiful hand knit socks you see online. Mine are simple, fun, and functional (both with or without the patches). I kind of wonder why others don't use patches knitting? I understand how ugly it would look on cables or lacework but for colorful fun kids sweaters or funky socks why not? I think it might be a good solution for a sweater with a moth hole or a snag.
If patched socks are not your thing don't worry I will post pictures of the denim shorts with felt embellishments I made a couple weeks ago next. They are some very simple fun kids clothes.
Tuesday, May 26, 2009
Cheeky monkey part 2
I was making up some summer shorts and still had monkeys in my head. I decided to make monkey shorts to go with the cheeky monkey top. The shorts are made from an old pair of my jeans (I wore them back when I was a size 4 that was 10 or 11 years ago). I cut off the pocket from the back side of the jeans and put monkeys on them. I then stitched the pockets on the sides of the shorts. I did this because with the long top pockets on the back would never show. I am SO HAPPY I did that! The shorts look very cute on my girl with the tiny side pockets. I tried using autopunch (embroidery software) 2 more times today to make the monkeys and they didn't turn out any nicer than my first try (I hope to figure that out someday). I put elastic in the back of the shorts. The bottom was all ready finished nicely for me. I use the hem that was at the bottom of the jeans (I call that smart quick crafting).
Front side.
Back side.
I had to take pictures of the outfit laying flat on the table and on the body shape because Zee wasn't being a coopertive model today.
She cried unless I let her have the apple and she kept blocking the outfit with the silly apple. I tried snapping about 50 pictures but she would put that apple back in front of her before the shutter would click every time.
This is the only picture I got without the apple blocking her top. I have no idea what she is doing with her fingers. LOL!My Cheeky Monkey!!!!
PS. I did finish Demi's dress last night I forgot to take pictures I promise to do that after I get my dishes washed up.
Monday, May 25, 2009
Monkey buisness.
The other night I was looking at clothes online at Gap baby (toddler 2-4T size of both my girls). I was doing a window shopping not real buying. I saw a tank that had a monkey hanging from the word cheeky. Cheeky monkey is the perfect way to describe my youngest! I decided to create a cheeky monkey shirt for my little girl. I wanted to make it quickly so I gave the auto punch that came with my embroidery machine a try. It was FAST!!! It did turn out OK BUT I want to find a way to edit the design to fill it in a bit more. To me the satin stitching (it is the part done in black thread) looks a bit thin. The shirt shows a bit all around the black. I looks like a gap between the outline and the fill (I hope that makes sense). If it was a bit wider my design would be full a better looking. I suppose making this design on a brown T-shirt would also make it look a bit nicer (I used a sheet because I was sure it wouldn't turn out). I think I might have done something to this design when using the auto punch. I wonder this mess up happened when I click on satin stitch for the outline? I wonder if it would have looked a bit nicer (been filled in all the way) if I didn't change the kind of stitching on the black part of the design? If anyone knows what I did and how to fix this (or how to prevent this from happening on my next auto punch try) and has a minute to clue me in I would be a very happy girl! I also have some puckering in the letters. I think that might be from using such a thin fabric but I wonder if I can do something to prevent the puckering the next time I use letters?
Here is the top.
Isn't that Cheeky monkey cute? My girl is only 20 months old so she won't complain that the embroidery isn't perfect.
For the readers who are not into machine embroidery I made a little dress for Demi (my almost 4 year old) yesterday. I used a lot of the crochet trims I made about a month or so ago on it. I just need to sew on the pockets tonight and I will share a picture of that. Sewing stretchy pockets on woven material might take a bit of time. I think I might just stitch them on by hand. I enjoy a bit of hand sewing to keep my fingers busy late at night. Anyway, I will share a picture of the dress very soon. I promise.
Thursday, May 21, 2009
Gift For My Mom and My New Toys.
Rob's xbox caught the red ring of death (that silly machine breaks a lot). The death of the Xbox ended up being wonderful news for me!!! Rob bought a new PS3 with lots of extra stuff (games and such) and he gave me the same amount of money to spend on whatever I wanted!!! I knew exactly what I wanted andwasted no time spending every last penny of my money. I bought the singer 250 futura sewing/embroidery machine (I have wanted this machine for about 2 years now). Note to everyone this machine has BAD reviews on Joann.com BUT I joined the Futura yahoo group and purchased my machine from WWW.SINGERTEXAS.COM . I felt confident that between the singertexas support and the 5,000 members on the yahoo group I would be able to find a solution to any "beeping problems". I have had my machine for a week now and have no problems. I bring up my bobbin thread and hold the ends for the first few stitches (like I do in free motion quilting) and I have had no problems with my machine. I have done about 60 or so trial embroideries and one finished project (shown at the bottom in this post) I know some people don't like singer machines. I LOVE THIS MACHINE!!!! I noticed that doing embroidery is more like quilting than sewing so I can see how some sewers or people learning to sew can struggle learning how to use an embroidery machine. I think a quilter would have an easier time learning. It wasn't hard to use at all!!! Within a couple hours of opening the box I was embroidering things. With the extra money I had leftover I also bought a huskystar embellisher (felting machine) this is something I have been looking at for about a year (safe way to let my children felt). I love felting and being a yarn spinner I have lots of wool around to use with this machine. I also got a few other things (jumbo embroidery hoop, new presser foot,and some linen fabric). I have been having lots of fun playing with my new toys (that is the reason I have been MIA in blogland). I just noticed that I have 50-100 projects that I haven't blogged and I see I am getting into my old routine of not taking pictures of finished projects before giving them away. I have made several things that I didn't bother taking pictures of (I hope nobody asks me how I made them because I know I will not remember). I need to try and do some catching up so I might try posting twice a day to catch up (if I can find enough free time in my days to do that).
The first thing I NEED to share is a garden bucket. I made it for my Mom for a Mother's Day gift. I plan to make 2 more for gardening friends and I am worried if I don't write about it now I will forget how I did it. I can't make the other two until Rob brings me home some more buckets.
To make it all I did was slip covered a 5 gallon bucket (the slip cover I made looked like a huge pillowcase) . I put the closed end inside the pail and folded the open end around the front. Elastic around the top of the "pillow case" is what holds the cover snug on the bucket. I now wish I would have taken pictures of the bottom of the bucket and a picture of what the cover looked like when it wasn't on the bucket. I will try to do that when I make the next one.
Pockets on the front of the bucket is just one long rectangle. I added elastic in the tops of pockets after I stitched them on because the pockets looked way to loose (tools hung WAY out). My next bucket I think I will add elastic across the top of the fabric before I stitch it on to make pockets. I will also tuck under my ends so stitches don't show. I didn't do that on this first one because it was easier to design the pattern this way.
I thought putting the flowers up and down would make it look like flowers growing. The problem is when the pockets are full of large things the flowers look more like mistakes than flowers growing so the next one I will line up all the flowers near the top of the pockets.I do like the look of the embroidered flowers on the pockets. I think the flowers staggered high and low looks nice on the empty pockets (to bad it doesn't look as nice when the pockets are full).
Below is a picture of the back side. I made a pocket for seed packets and two other large pockets. For the 2 pockets on the bottom I ran elastic across the top first then sewed the pockets on. I think if I run one huge pocket strip with elastic on top that goes all the way around the bucket it will be easier to sew it together and it will make snug pockets (things won't fall out if bucket gets knocked over). BUT I am not sure that is the way I should make it because I do like the look of the front pockets a bit better so I will need to do some thinking about this before making my next one. If I ever make one for myself it would be easy to tell if the bucket falls over and needs the tight pockets or if the loose nicer looking pockets hold everything inside.Can you picture how it would hold tight and look snug if the back pocket in the picture above ran all the way around the bucket? I know this would make it a quick sewing project BUT I do like the shape of the pockets on the front side of bucket a bit better.
Pillow for knees!
My Mom's name is Linda (I guess you already figured that out). This was originally going to be a pocket but it didn't look right on the bucket so I turned it into a gardening pillow.
It attaches to the bucket handle with a snap. you can see the button hole I added to the cover so the handle and the bucket can attach without messing up my cover. I made one nice button hole and one not so perfect button hole. I am not sure what hole this is (my luck it is the not so nice button hole). NOTE TO SELF... Don't sew button holes late at night. You always mess at least one up when you are tired wait until the morning to sew any button holes!!!!
For the next bucket I will tuck in the stitching above the snap and top stitch it so it doesn't show.
Below is a picture of the stuff I stuck inside the pockets. I assumed she already had a nice set of gloves and gardening tools so I bought all cheaper things that she could use if hers bend or get lost (or let grandchildren use when they want to help). They are more for looks to fill the pockets than they are "gifts". I had plans for my children to decorate wide pop craft sticks for plant markers to fill the last pocket but I somehow misplaced my huge box of craft pop sticks (shh don't tell my mom she doesn't know her gift wasn't complete).
Below is an odd angle of the bucket. It really looked much better than this (at least I think it did). I wish I would have taken a closeup picture of the watering can and the ladybug. The watering can embroidery looked so nice (it was a free one I found online but I can't remember the web page right now). You can see a close up of the elastic around the top in this picture. I ran elastic around the bottom of the bucket and around the rim. I figured it was the best way I could think of to hold the bucket cover on and keep it from sliding around.
Below is a picture of the front side full of gardening stuff. Notice how the lower flowers look bad when pockets are full? They look like crushed flowers (not the growing flower look I was going for).Inside the bucket I stuck 4 small veggie plants.
I figure she can use the inside to carry out plants or a watering can. She can fill the inside of the bucket with weeds when she is weeding. And she can fill it with her fruits and veggies when it is time to harvest. OR she can use the inside as a place to stick sprinkler or other gardening tools out of the way.
I feel bad that this project was not perfect for my Mom (I always feel this way after making my first of anything). This is the way my designing goes. I don't use patterns so I often have a hard time taking a picture in my head and getting it to work right on real materials. The first of anything I make is usually functional but always has lots of room for improvements. My Mom (like all Moms) is happy with anything her children make (even a child that's 38 years old). She doesn't mind the mistakes (this is the reason my mother gets the first of almost anything I make). Many times I only make one and never feel like making anymore. So even though my mom sometimes ends up with my worst projects she often ends up with the one of a kind projects that nobody else gets. I had TONS of fun designing it. It was a lot of fun and I learned a lot about how I can improve on this idea for my next one. I feel good that it ended up being a functional garden bucket (but really how can a store bought bucket not function as a bucket). Starting with a bucket was an instant success.
I think before starting my next one I need to decide on the pocket style and elastic placement. Once I figure out what pocket style I like the best making many more garden buckets should be easy. I have plans to make 2 more and I think by the time I finish them I will have my pattern set up the way I like it.
Friday, May 01, 2009
Happy May Day!
Here is how I celebrated May Day.
I made lots and lots of flowers yesterday and today to celebrate May Day.
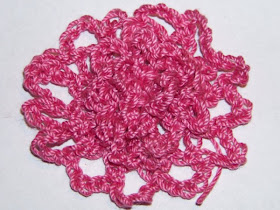
Let me back track to fill you in on how I got to making tiny flowers. It all started just before Easter when I wanted new socks to go with my girls' dresses. I was too cheep to run out and buy socks and all the socks my girls own with ruffles, ribbon, or bows all looked a bit old. I played around (just hooking into a sock with some crochet yarn) and crocheted a ruffle. You don't need a pattern to do this just stick your hook into a sock (near the top) and add a crochet stitch (1/2, single crochet, double crochet, triple or such) doesn't matter what stitch or how many rows. It is fun to play around with. I had 3 pairs done by Easter. Easter morning I looked at the socks and thought how they looked like doilies. My mom even mentioned that at Easter dinner. Later that night I made.....
I think they are cute. Before you judge please remember I am not a skilled crocheter. I can't read a pattern and I don't even know what stitch is what. I plan to use them to decorate some clothes for my girls when I get some free sewing time.
A few days later I made a couple dark pink ones,
I am not the doily type but I have to say crochet has a beauty to it you don't get from knit. Look at the twisted knotted stitches in my doilies above. I love the look of the stitches.
I have a bunch more floating around the house. I hope to have enough done for some fun sewing in the next couple days.
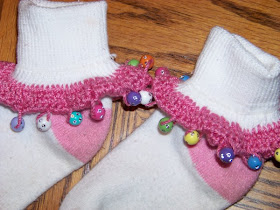
I also made many more fancy top socks. Demi cried for beads in the store a few weeks ago. I told her no that I wouldn't make her another necklace. I have made her several necklaces in the last few months but she always ends up breaking them. She then asked if she could have the pretty beads on her socks. I agreed to get her some new beads but ONLY for socks. We now have several pairs of bling bling socks. LOL!
If you are wondering how I did it all I did was string a bunch of beads on my yarn. I used crochet yarn and beads with holes large enough to string on the yarn. I crochet around and around then when I wanted a bead I slid it up the thread and hooked it into the sock. I bought one pack of beads and made 5 or so pairs of socks. One sock only needs about 6-8 beads. I did put the same amount of beads on each sock so the socks would match. I know we are all getting sick of looking at sock trim!
In the last couple weeks I quit taking pictures of crochet top socks because I have made so many they all look a lot alike. I change the color of thread, beads, sometimes add ribbons, and the length of ruffle changes but still they are all starting to look alike. They only take about 30 minutes to dress up a pair of boring socks so whenever I need a quick and easy craft for the day I grab a pair of socks.
I have had so much fun playing with my crochet hooks. I really want to learn how to follow patterns and crochet someday but for now I am having fun just playing around. As I was messing around with socks and doilies I started thinking about when I was little sitting on the floor in my mom's sun room with her crochet hooks and making little things for my Barbies. My mom showed me how to do several different stitches with the hook when I was young but she never taught me to use a pattern. I remember when I was a bit older (middle school age) our we had a class in sewing that covered a little crochet. We all made google eye curly Q snake thing. I think it was a bookmark. It might have been a bookworm now that I think about it. Thinking about this snake (or bookworm) that had a head that curled around and around and it made me think how that might make a flower shape. I knew if nothing else it would make a fun trim for something. I started playing around with a chain of 15 stitches and I put 3 or 4 stitches in each chain and curled it up (sewed it with the end strings) and got something that I think looks like a pretty flower (maybe a rose bud).
I think they are cute and I have made a rather large stash of them over the past 2 days. I plan to use them for decorations on my little girls' clothing, hair clips, shoes, and maybe some socks.
I made this one with a bit thicker yarn.
Playing around taking a doily type piece and hooking into it with a bit of the flower bud thing gave me this umm.... doily flower? I don't know what it is but I know it will make fun decoration for my sewing projects.
I also want to share a bit more crochet trim (I made it yesterday).
Quick, easy, simple, yet beautiful (at least I think so). It is just a long length of crochet. Last summer I made up Zee a few shorts and dress sets with crochet trim. I would like to do the same this year.
This week I spent a lot of time spinning yarn. I am spinning up some silk bells I have had for years now.
I noticed I only payed around $3=$4 a bell so it would make some cheap yet beautiful decorations for my girls' hair clips, shoes, and dresses. I am thinking I will try using some of it as embroidery thread and maybe some for crochet trim for dresses. I will share how it all turns out when I get that far.
If guess you noticed that I am obsessed with trims right now. The reason for that is last week I ran to Walmart (to pick up a $2 crochet hook) and ended up spending over $35. I looked over my bag and noticed that all the money was spent on embellishments! I had a few beads, buttons, ribbons, lace and such. I only get $20 a week allowance so spending $35 was a big wake up call! That got me thinking of how I need to get back to making more of my own trims to decorate my sewing projects. I guess some crafty girls spend money on paper, some on fabric, some choose yarn, and others choose patterns. I like all that stuff but never feel a need to spend a lot of money on any of that stuff. My money tends to go on doodads! Zippers, embroidery floss, ribbons, buttons, bows, trims, beads, paints, iron-ons, and other doodads that my girls think are cute. I want to get back to making things and using what I have (or make it myself). So I can have a bit of cash on hand for when I need it.
Well that covers what I did today, yesterday, and includes some of the older things I am trying to catch up on. I hope by the end of this month to be all caught up with posting my old projects from earlier this year.