Monday, October 31, 2011

Happy Halloween!

I got to make costumes for all 3 kids this year.  Most years I have at least one child who wants a cheap store bought thing. I'm happy to say all 3 children loved what I made them (I'll enjoy this day because I don't think it will ever happen again).    My middle child asked to be a peacock.  Our name is Peacock so I couldn't say no. 

The body of the costume is an adult skirt.  The skirt had 2 layers so I used the underskirt for her arms/wings.  I used fringe yarn for the blue front.  I added green fabric pieces to create feathers.

The back lower tail (she's a 2 tail peacock) was made from layers of tulle.  I added some peacock feathers to it and some more fringe yarn.    The top tail was made from a fan.  Finding a way to attach the fan took some time.  I ended up making an elastic belt to hold it on.  To fasten the elastic belt I added a button to the belt and cut a hole in the elastic to use for the button hole.  I also added a button at the top back of her dress and I added an elastic loop on the fan to loop on the button.  That kept her proud feathers from flopping down.  The blue ribbon bow was to dress it up and to make sure my elastic didn't show.


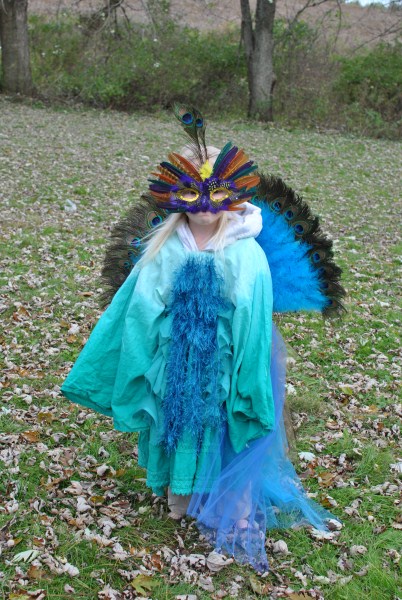
I got her 2 different feather masks and she loved them both. She talked for weeks about how she couldn't decide which one to wear.  At the last minute she completely changed her mind.  Just before we left the house she decided she didn't want to wear either mask.  I've had a bad cold for the last 2 weeks so trying to make 3 costumes in time was very difficult.  I ended up finishing them 15 minutes before we left the house.  I will try to take some pics of the tiny details (loops to hold it up and the belt) tomorrow.   If anyone wants to see them just let me know (I doubt many people want to be a peacock but it could happen).

I hope you all had a very safe and happy night!
I'm linking to

Friday, October 28, 2011

DIY princess shoes

My youngest is going to be Rapunzel for Halloween.   She needed princess shoes to finish off her costume.  I have a lot of sewing to finish up three costumes.  I knew I wouldn't have time to sew up princess slippers.   To save time I decided to upcycle an old, scuffed up, summer shoes that she already had.

Here are the old shoes.


After a little bit of Mod Poge, Martha Stewart glitter, ribbon, buttons, and spray sealer...


Ta-da!  One pair of glittery, pink, princess shoes!

At first Zee said Rapunzel wears purple shoes but after I let her pick from my large collection of glitter she changed her mind to pink.


She is very happy!


My other daughter is very green with envy.  I promised her that I would make her some glitter shoes after I finish all 3 Halloween costumes.

I have to rush off I've got some cosumes to finish!  Halloween in in just a couple days.


I'm sharing this with

>

Thursday, October 27, 2011

Sleeping Beauty

Demi (my 6 year old) played the part of Aurora (sleeping beauty) when she had on our thrift store wedding gown.

I'd love to make her a story book and put this photo in for the sleeping princess.

 
What do you think? 

She reqested I make a photo in a shade of pink.

 This dress is so much fun to play with!
 Is it wrong that I can't wait to cut it into pieces to make lots of little dresses?
 I think everyone who has a little girl so try a photo shoot in a wedding gown.


 I'll race you all to the thrift store to find another gown. 

Sweet dreams everyone!

I hope tomorrow to have at least one Halloween costume finished so I can share.

Wednesday, October 26, 2011

Reason #2 to buy a wedding dress.

Reason #1 in why to buy an old wedding dress was to make pretty fairy wings. Reason #2 is to use for a child photo prop! Zehira (my 4 year old) loved playing dress up in our thrift store wedding gown today. We didn't need a back drop. This 1980's princess style dress has a train so long it covered our sofa.

Here are some unedited photos for people who don't like the look of edited photos.


Either way I think they turned out pretty. I think I'll have prints made to decorate her bedroom and maybe a few to give as gifts to family. I think this $10 thrift store dress gave me over $10 worth of pretty pics. I'll be using this dress to take photos of my other daughter (and all my friends with little girls) before I cut it up.

I'm sharing this post with
Somewhat Simple

Monday, October 24, 2011

DIY Ponytail holders


We're no longer homeschoolers. This year my 11 year old son and 6 year old daughter enrolled at a small private school. My children have made lots of friends and they both LOVE school. BUT going to school did create a small problem... TORN TIGHTS! UGH! Demi has to wear a uniform skirt (pants are not allowed for girls) so I put her in white tights to keep her legs warm. She stumbles/falls at least once a week and gets a hole in the knee of her new tights (she never seems to tear her older tights). After a bit of thinking I decided to cut them up to make ponytail holders. In a house with 2 little girls both with long hair we use a LOT of ponytail holders. Every week I buy a large pack of ponytail holders (at the same time I'm buying new tights). NOT anymore! I now cut up the tights to make ponytail holders. They work great in my girls hair (they don't tangle or break hair). It's so simple you can make a large amount of ponytail holders in a couple minutes!

Above is a pair of tights with a hole in the knee (they are size 4-7 but any size tights will work).

Grab your scissors and start snipping the tights. I snip them about 1/2 inch wide.

Here is one leg all snipped in loops (not looking like ponytail holders yet).


Stretch the loops a bit and they will curl up into a ponytail holder like magic!


I now have a few weeks worth of ponytail holders. No need to get mad over tights with holes anymore. :-)

I have no idea what happens to all of our ponytail holders after they are in my girls hair. I know they should be in the house someplace (Demi comes home with them still in her hair every day). They seem to vanish soon after she gets home. Someday I'll find that hidden spot under the bed or back of closet that is holding 6 years worth of ponytail holders. Until then I'll keep cutting up torn tights.

Here's a photo of Zee's ponytails (snapped when she was eating grapes).
Here's a shot of Demi's ponytails after a long day of school and changing into play clothes.


No more tears over torn tights at my house!
Tip Junkie handmade projects

Newborn size Tinkerbell costume.


I'll start out by writing about the sewing project I just finished (I'm going to pretend I never took a blog break). My brother and SIL had twins (both a girl and a boy)! I was SO EXCITED when my family asked me to make a Tinkerbell costume for Halloween! I've never made a tiny newborn costume before. It was so FUN! I didn't spend any money on supplies. To make this outfit I used 2 dresses I bought at the thrift store a few months ago (dresses I didn't have any plans for yet). The body of the dress was made with from a very large, green, dress. I will use the rest of this dress to make more things over the next few months. Please forgive the wrinkles in this dress (I took this picture before I washed and ironed it). The wrinkles are from leaving it in the shopping bag for so long (I often hide thrift finds in the shopping bags under fabric yardage to keep my hubby from asking what I plan to do with it until I find a use for it). Check out the price tag $4.99 and I bought it on 1/2 price day. I paid $2.50 for this dress!!! I'd say the dress size is over a size 20. It's a full length dress made for a tall person (or a girl with very high heals). It is LOTS of fabric for $2.50!!! This dress and trim is all the same fabric. The satin fabric was shiny on one side and dull on the other.
To make fairy wings I used part of another dress. I bought a wedding gown at the thrift shop for $9.99! This gown has a HUGE train! To me it was an awesome deal! I'm sure you will see a lot more of this dress in the next few months. Do you see how crazy long this train is? I can make oodles of child size dresses from the train alone! This dress is wrinkle free because I didn't have to hide it in the bag. I've been asking my hubby to let me cut up my wedding gown (to make little girl dresses) for years now. He won't let me (he thinks our marriage will fall apart if I cut into my gown). Hubby has known I've wanted to cut up some wedding gowns so I didn't have to hide this large gown I hung this out in the open the day I bought it. What a great deal! $9.99 for so much satin, lace, buttons, beads, ruffles and such.


Here is a close up of the ruffles (what I used for fairy wings). This dress has 2 full skirts with a huge train. Both skirts have the ruffles (over $10 worth of ruffles on this dress). In a house with 2 little girls I know I'll use up every yard of ruffles.


I sort of made up the pattern as I went along. I made half the skirt shiny and half not (trying to give it more a leafy look). I tried to add petal sleeves but they were so tiny I got tired of fussing with them so I bound the arm holes with some matching FOE I had on hand. The dress is fully lined using the lining from the original green gown. To make the wings I just cut off some ruffles from that wedding gown and tacked them on the back. It was such a quick way to make baby wings!

To finish the look I made tiny fairy shoes. I used a tiny bit more of the wedding dress ruffle to make the puffs on the shoes.

I love how her wings turned out. I was worried the standard nylons over coat hanger wings would be an unsafe choice for a newborn baby.
Here is one more shot of our sweet little fairy. She's in her nana's arms.